Category: how

  • Command Line Knowledge for MacOS: Dealing with Active Directory

    Well, we have to play nicely with all of the Windows stuff that is out in the world. In the enterprise, we have to accept that we are going to have to deal with Windows Networking, particularly authentication and authorization services provided by Active Directory.

    Apple has improved the integration with Windows Networking over the years but you still have to do a bunch of contortions to get a machine on the network. Note that the following is taken from multiple Apple support sites and some AI assistance.

    Joining a machine into an AD domain and configuring it for network authentication requires you to bind the machine to Domain through Directory Services and then configure authentication on the local machine to connect to the AI domain.


    1. Bind the Mac to the AD domain

    macOS includes the dsconfigad tool (Active Directory connector) which allows you to bind a Mac to an AD domain from Terminal. (Apple Support)

    Here’s a typical command (you’ll substitute your values):

    sudo dsconfigad -add DOMAIN.COM \
        -computer "Mac-Hostname" \
        -username "BindUser" \
        -password "BindPassword" \
        -ou "OU=Computers,DC=DOMAIN,DC=COM" \
        -force

    Explanation of parameters:

    • -add DOMAIN.COM → The AD domain you’re joining.
    • -computer "Mac-Hostname" → The name you want this Mac to appear in AD.
    • -username / -password → Credentials of an AD account with rights to bind computer objects.
    • -ou "…" → The organizational unit in AD where you want the computer object to reside.
    • -force → Optional, for example if it was already bound previously, etc.

    Other common flags you may want:

    sudo dsconfigad -domain DOMAIN.COM \
         -alldomains enable \
         -groups "Domain Admins,Enterprise Admins" \
         -packetsign require \
         -packetencrypt require

    This enables all domains in the forest, adds certain AD groups to the Mac’s “admin” group, and enables packet signing/encryption for LDAP/AD traffic. (Apple Support)


    2. Enable network users to log in at the login window

    Once the Mac is bound, you need to allow domain users (network accounts) to login at the macOS login window. There are GUI steps (System Preferences → Users & Groups → Login Options → “Allow network users to log in at login window”), but we can achieve this via command line/config defaults.

    Command-line approach

    You can use the defaults command to set a preference so that network users are allowed to login. Example:

    sudo defaults write /Library/Preferences/com.apple.loginwindow ENABLEDIRLOGIN -bool true

    This sets ENABLEDIRLOGIN to true, enabling directory (network/AD) users at login. (Note: this key has been used historically, though exact availability may vary across macOS versions.)

    Also ensure that the login window is set appropriately (e.g., “Name & Password” rather than “List of Users”). For example:

    sudo defaults write /Library/Preferences/com.apple.loginwindow SHOWFULLNAME -bool true

    Then you may want to restart the loginwindow or reboot:

    sudo killall loginwindow

    Mobile/local account caching and mobile user accounts

    This is a an important step that some sites wrongly suggest as optional. You really, really, really, really want to use dsconfigad to enable domain users to have mobile accounts. This will cache credentials locally and will permit users to login when offline from the enterprise network. Otherwise you won’t be able to login. We also strongly recommend that you do keep a separate local user for when things go wrong.

    Here’s how to enable mobile accounts in MacOS via dsconfigad:

    sudo dsconfigad -mobile enable -mobileconfirm disable -localhome enable

    (from the gist example) (Gist)


    3. Verification & Pitfalls

    • After binding you can check current settings:
    dsconfigad -show

    This will display the domain, computer account, OU, mobile account settings etc. (Gist)

    • Make sure DNS is correctly configured: the Mac must be able to resolve the domain controllers for your AD domain. Apple’s documentation emphasizes DNS/Kerberos/LDAP for AD integration. (Apple Support)
    • If users cannot login:
    • Check that “Allow network users to log in at login window” is indeed enabled (GUI or defaults).
    • If after login attempt the screen just sits/spins/shakes, it may be waiting on network/LDAP/Kerberos auth. Example case discussed in Apple forums. (Apple Support Community)
    • LocalAdmin vs domain group membership: If you want certain AD groups to be local admins (e.g., “Domain Admins”), you’ll include that in the binding via -groups flag. Otherwise domain user logins may succeed but the user may lack local rights.
    • For macOS versions and AD interactions: some behaviors may change from version to version (especially around caching or login window UI). Always test in your environment.

    CAVEAT: We admit to using AI tools to research and edit this post.

    Selah.

  • How to: Unity and GitHub – Steps to get started

    Unity builds a lot of stuff, lots of which are files generated by the tools that shouldn’t be committed to version control.

    • Create new empty 3-d project in Unity Editor
    • Create a new empty repo in your GitHub account
    • Use text editor to add a README.md in the root folder of your project
    • Go to GitHub’s archives of .gitignore files and grab the .gitignore for Unity development.
      • Place this file in the root folder for your project
    • Execute the following script:
    git init
    git add README.md ,gitignore
    git commit -m "first commit"
    git branch -M main
    git remote add origin https://github.com/adamwadelewis/gallery.git
    git push -u origin main
    
    • Now add the contents of your Unity project folder to your repo and then commit and
  • How to: Configuring macOS for web development: Part 3 – A Coda to Part 1 & Homebrew

    “Wait a moment, you’re using Homebrew?”, you say Dear Reader? “If you are using Homebrew, shouldn’t we use the copy of the Apache that comes with Homebrew?”, you say?

    It’s a viable alternative. Just like with PHP and other things, using a package manager like Homebrew to install the web server in user space means that you can keep up a lot more rapidly with upstream changes in Apache. Down side is you have to undo some things in the system and remember to confirm and redo these things when you update macOS.

    Let’s go about it… we need to turn off the version of Apache included in the operating system:

    
    sudo apachectl stop
    sudo launchctl unload -w /System/Library/LaunchDaemons/org.apache.httpd.plist 2>/dev/null


    This turns off the server and unloads the system install of Apache from the list of services loaded at system startup.

    Now we get things up and running with Homebrew:

    
    brew install httpd
    brew services start httpd


    One more configuration adjustment: to keep things somewhat clean, Homebrew’s Apache installer defaults to run on port 8080 rather than port 80. This avoids conflicts issues between the system install of Apache and the Homebrew version. But we want the Homebrew version to server pages on the default port.

    How to fix this, edit /opt/homebrew/etc/httpd/httpd.conf to switch the listen port to port 80. Use your favorite edit to find the Listen line in the file and make certain it looks like this:

    
    Listen 8080


    Now restart the server using brew services restart httpd.

    An opinion

    There is a common thread among the different blogs telling you how to do this that recommends you reset the server root to the Sites folder in your home folder. This is not something I recommend you to do as I believe you need to have a separation between production and development code. Feel free to reconfigure Apache in this manner as you wish but I’ll leave figuring how to do this to be an exercise for the reader.

    Do go back and apply the changes I introduced in Part 1 of this series to get your home folder configured. All you need to do is adjust the files names to use the configuration files in your Homebrew install.

  • How to: Configuring macOS to do web development: Part 2 – PHP

    Apple recently made the decision to remove PHP from the OS image.   That’s a good call as the version included with the OS quickly gets out of date.   So, it’s up to us as software developers to manage the install and update of the development tool

    A Quick Aside

    Time to express an opinion: I am not a PHP fan. It’s a kludge of a language built on top of a kludge of web application architecture. But enough back-end stuff remains built on that architecture that one has to understand it and sometimes support it.

    Back to our regular programming

    For macOS, the simplest way to manage installing and configurating PHP is to use a package manager like Home-brew. It’s a one line install command:

    
    /bin/bash -c “$(curl -fsSL https://raw.githubusercontent.com/Homebrew/install/HEAD/install.sh)”
    

    Worth noting that is a lot of gooey, cruchy open-source goodness in the Homebrew repository.

    At this point, you can install PHP:

    
    brew install php
    

    This will get you PHP8. If you need earlier versions, then you will want to use one of the specific version casks in Brew.

    And now things get macOS ugly

    We want to configure our Apache install to use PHP. H

    Time to hack! Configuring Apache

    Things begin by adjusting our Apache configuration to load PHP. Edit the Apache httpd.conf configuration file:

    
    Sudo vi /etc/apache2/httpd.conf
    

    Add the following:

    
    LoadModule php_module /opt/homebrew/opt/php/lib/httpd/modules/libphp.so
    <FilesMatch \.php$>
        SetHandler application/x-httpd-php
    </FilesMatch>
    

    Confirm that the DirectoryIndex entry includes “index.php”:

    
    DirectoryIndex index.php index.html
    

    Now we code-sign

    Here is where Apple tightening up security in macOS 12 bits us in the posterior: Homebrew’s stuff isn’t code-signed. Means that Apache will puke upon us when it tries to load the PHP module.

    We have to manually sign the package. This requires some finagling with keychains using the Keychain Access utility and the Xcode command-line tools.

    Here things get “interesting”. We need to adjust macOS to allow us to self-sign certificates. In other words, we get to be our own “Certificate Authority”.

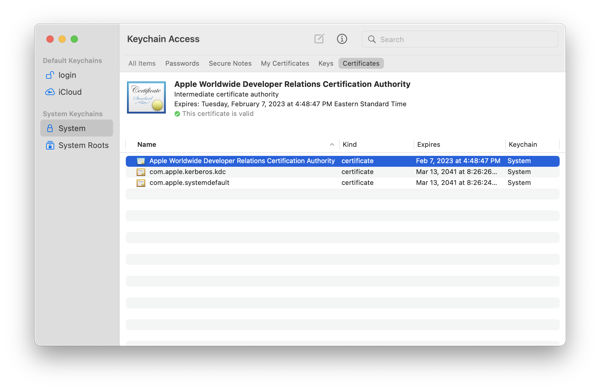
    Launch the macOS Keychain Access utility:

    UntitledImage

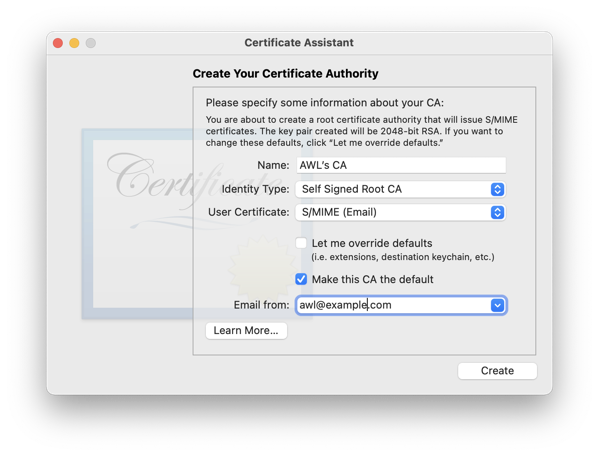
    Now goto Keychain Assistant>Certificate Assistant>Create A Certificate Authority

    . You should see something that looks like this: UntitledImage

    Do the following:

    1. Adjust the name as needed.
    2. Select “Code Signing” from the “User Certificate” dropdown.
    3. Turn on the “Let me override defaults” checkbox
    4. Enter your e-mail at the appropriate location
    5. Select “Continue“
    6. Accept defaults for Certificate Information
    7. Enter appropriate certificate information and select “Continue”
    8. Accept defaults for the Key Pair information for both certificate and users
    9. Do the same for extensions
    10. Turn on the “Extended Key Usage Extension for This CA” option
    11. Select the “Code Signing” checkbox that appears
    12. Accept defaults until you get to the create screen
    13. Turn on “On this machine, trust certificates signed by this CA“
    14. Select “Create”
    15. Close the “Certificate Assistant“

    Sign the PHP module using the Xcode command-line code signing tool (replacing ”AWL“ as required):

    
    codesign –sign ”AWL“ –force –keychain ~/Library/Keychains/login.keychain-db /opt/homebrew/opt/php/lib/httpd/modules/libphp.so


    Now again edit the Apache httpd.conf file and adjust the entry for PHP as below (again, replacing ”AWL“ with what you used in the certificate):

    
    LoadModule php_module /opt/homebrew/opt/php/lib/httpd/modules/libphp.so ”AWL"


    Now restart Apache and you should be ready to rock and roll:

    
    sudo apachectl -k restart


    Selah.

  • How to: Configuring macOS to do web development: Part 1 – Apache

    A good chunk of what we need do web development exists in macOS 12.1 (Monterey) without having to resort to add-ons like the XAMPP stack. I have enough of my students asking me how to do this that I thought I would consolidate my notes and put them up on the web so I can just point them at that reference. This is going to pull from multiple sources and I’ll try to acknowledge every one that I can. Let me know if I missed one.

    There are some things you will need to add.  Recent versions of macOS no longer include PHP as part of the operating system.  That’s actually a good thing as the tendency has been for the version included has tended to lag behind the current tip of development.  Here’s where you find yourself using a package manager like Homebrew.

    First step: Configuring Apache

    The OS includes the Apache web server.  It’s buried pretty deep into the system bits so you are going to having to apply some important skills:

    • Understanding of working with the Terminal.app to run command-line programs to update configuration files and manage the web sever
    • ,

    • Know some of the internals of the Apache web server,
    • And know how to open and save files in text editor like vi or nano.

    This information is spread over the Internet but the bulk of the material is taken from the Apple tech support discussion forum at https://discussions.apple.com/docs/DOC-250004361

    Start by editing the web server configuration file located at /etc/apache2/httpd.conf. Note that this requires admin permissions, so you will need to use sudo:

    
    sudo vi /etc/apache2/httpd.conf
    

    Look for the line in the file that enables the “Sites” folder for individual users (this is equivalent for macOS as public_html is for Linux). In recent versions of macOS, this is at line 184 in the file. Uncomment that line by removing the leading “#” comment indicator. It needs to read as follows:

    
    Include /private/etc/apache2/extra/httpd-userdir.conf


    Save and exit the editor.
     

    This change tells the web server to look for an include configuration file that will define user folders in the web server. Edit that file:

    
    sudo vi /etc/apaches2/extra/httpd-userdir.conf


    Uncomment line 16 of that file so that it reads:

    
    Include /private/etc/apache2/users/*.conf
    

    Now you need to tell the web server that about your user folders. First step, look in the Users and Group preferences pane to get your short user name. Right click on your user name in the pref pane and select “Advanced Options”. The short user name can be found in the “Account Name” field. For discussion purposes, we’ll use my short name of “alewis”. Replace this with your own when you do this,.

    Now let’s use your tex editor to create a configuration file for user folders:

    
    sudo vi /etc/apache2/users/alewis.conf
    

    Add the following content:

    
    <Directory “/Users//Sites/”>
     AddLanguage en .en
     Options Indexes MultiViews FollowSymLinks ExecCGI
     AllowOverride None
     Require host localhost
    </Directory>
    

    You will need to add additional configuration items to this file if, for example, you want to enable PHP.

    Then create the Sites folder in your home folder:

    
    mkdir ~/Sites
    echo “<html><body><h1> My site works</h1></body></html>” > ~/Sites/index.html.en
    

    This creates the Sites folder and adds a minimal working example in the folder that we can test against shortly.


    Now we have to do some shell voodoo. Apple has tightened up the security in macOS 12 to, by default, not allow other users access to a user’s folders,. The macOS installation of Apache is configured to run in a special hidden user account named “_www”. You need to setup an Access Control List (acl) that lets the web server have access to your folder:

    
    chmod +a “_www allow execute” ~/Sites
     

    And now we see if things work. With Apache, one should always use the web servers configtest command to make certain things are configured in a clean manner:

    
    apachectl configtest
     

    So… what’s apachectl? That’s a command line tool that one uses to control the web server (which is an Apache thing, and so works on any of the UNIX-based operating systems). If the config test returns ‘Syntax OK’, then you are ready to rock the web.

    Now for macOS command-line magic… you need to tell macOS to start Apache at system startup:

    
    sudo launchctl load -w /System/Library/LaunchDaemons org.apache.httpd.plist
    

    If you want to get things running in the meantime, do a:

    
    sudo apachectl graceful
     

    At this point, navigate to http://localhost and http://localhost/~<your short user name> and see if you get the expected responses from the web server.

     
    Reference: https://discussions.apple.com/docs/DOC-250004361

    Next up: Getting PHP to work using Homebrew.

  • Command Line Knowledge for macOS: software update

    One of the leading reasons to dive into the command-line tools in macOS is automation.   Writing scripts that link with the Shortcuts stuff adapted from iOS means you can automate some things.

    For instance, there is a command-line tool that you can use to run software updates: software update.

    Consider:

    
    softwareupdate -l


    This gets you a list of available software just like what happens in System Preferences when you launch the Software Update preference pane. In both cases, the utilities are talking the softwareupdate daemon in the operating system.

    Next up, getting stuff installed:

    
    softwareupdate -I NAME
    softwareupdate --install name


    You replace NAME with one of the items from the list you asked for in the first step. Be careful there as macOS is very sensitive about names and format of names. You should quote the names and watch out for cases where the name has trailing spaces.

    The “-d” option will just download an update while including the “-a” option will install all available updates. One of the useful options for this command-line tool is “–install-rosetta”. This option tells macOS on Apple silicon Macs to install the Rosetta 2 hypervisor/emulator for Intel macOS applications. Include the –agree-to-license” option to agree to the software license agreement without user interaction.

    Selah.

  • Command line knowledge for macOS

    Non-developer types (you know, you “normies” out there) tend to want to do everything using the mouse rather than the keyboard. Really true for people using macOS. Makes me hurt when I see it as there are many things easier to do with the command line than with multiple mouse clicks.

    This isn’t going to be series talking about how to do stuff in Bash or zsh using the Terminal application. Lots of introductions out on the Intertubes about Shell programming and how one can use it to automate for fun and profit. This series is going to point out things that about using the command line in macOS that you don’t often hear about.

    Like what things? Many of the tools you use to run macOS have lesser known command line interfaces. Classic examples are apps like Disk Utility and Software Update. Both have command line interfaces that allow you to do stuff in single commands that take multiple clicks in the GUI. That’s what we’re going to examine in this series of posts.

    But there are some things available to you in the Terminal app and with Bash and/or zsh that you can use to make your life easier. Drag and drop is supported by Terminal… dragging a folder icon from Finder to the Terminal’s Dock icon opens a new window in the app and changes the current working folder to that that folder. Dragging files onto a Terminal window inserts their paths separated by spaces.

    A really useful thing is the open command. Issuing the command by itself in a shell will open the current working folder in a Finder window. You can specify a file name as an option:

    open ~/Library/Preferences
    open ../..
    open /etc
    

    Provides a quick way to get to hidden folders when you need to do something “admin”-like on your machine.

    You can open a specific file, which will use the current association for that file type to open the file, or use the -a option to specify the app to use to open the file. You have the -e or -t options to open a file using TextEdit or your favorite editor.

    Really useful is the -f option which allows you to pipe text into the open command. This allows you to use open within shell pipelines, up to and including getting output from a command into a text editor.

    Lots of things that you can do here and Terminal’s linkages into Finder and the open command give you way to link the things you do in the Terminal with the windowing system and vice-versa. So go grab a good tutorial in the use of zsh and enjoy!

    Selah.

  • A Useful Little VirtualBox Trick

    I’m teaching a Security Fundamentals course this semester and we’ve gotten to the point where we’re talking network security. In particular, we’re talking about using Wireshark to monitor and trace networks. I’ve found an interesting and useful little feature in VirtualBox.

    Virtual Network Cards

    VirtualBox, like most virtual machine managers, emulates network interface cards. So… how can I go about tracing these interfaces? The neat feature is that we can use the command-line management tool to capture all traffic on one of these virtual interfaces.

    Step 1: Turning on network capture

    Let’s trace traffic on the first virtual network interface:

    VBboxManage modifyvm "ubuntu" -nictrace on -nictracefile1 vmtracefile.pcap"
    

    This turns on the tracing of the first network interface in the “ubuntu” virtual machine. At this point you start the VM and duplicate whatever situation you need to test.

    Step 2: Turning off network capture

    When you’re done, you turn off the tracing with the command:

    VBoxMange modifyvm "ubuntu" -nictrace off
    

    A few caveats

    Don’t forget to turn off tracing as it’s both a security risk and the trace files can get very large. The VirtualBox documentation suggests the use of snapshots in combination with this feature to keep track of what you’re doing and minimize the window in which tracing is left on.

    Lessons learned

    Look closely at the underlying command-line interfaces for your virtual machine manager. One can find many very interesting features and tools hiding underneath the covers of the GUI.

    Selah.

  • Learning Ruby… going about learning a new programming language


    I teach computer science at a small state college to pay the bills. One course that I regularly teach is “Objected-Oriented Programming and Design”. Our program is very C++ focused and this course is the class where we pound the more advanced aspects of C++ into our students and try to give them a flavor of other ways of doing OOP by introducing them to other object-oriented languages.

    So… what other languages? In the past, I’ve taught the course by talking advanced C++, hitting Java pretty heavy, and doing a quick overview of Smalltalk to show students the “pure object” way of thinking. Teaching Smalltalk has been problematic… that language is so different from anything most of my students have seen that they go into vapor lock. Most of these folks are community college graduates looking to complete their four-year degrees (more on that in a future post) and haven’t had the deep dive background that you get in other programs. This has meant that I’ve had to go looking for a language that I can use to demonstrate the “pure object” idea without causing heads to go spinning out in the classroom.

    That leads us to Ruby. I like the way that Dave Thomas described the language in one of his books:

    Take a true object-oriented language, such as Smalltalk. Drop the unfamiliar syntax and move to more conventional, file-based source code. Now add in a good measure of the flexibility and convenience of languages such as Python and Perl.

    So it appears that it will meet the needs of my course. However, it’s not a language that I’ve ever used for production development. I like to develop some ninja-level skills with a language before I have to try to teach it to other people.

    So, oh Noble Readers, I intend to subject you to a series of posts that describe my experiences on learning Ruby. These posts will be the basis of my lecture materials for my class and will hopefully give you a feel about how someone like myself who has had the “fortune” of having learn many different programming language over time learns a new one.

    Selah.

  • Computing like it’s 1999

    One of my recent “science fair” projects has been trying to get an older ASUS EeePC 900A netbook configured to a usable state. This was one of the first really practical netbooks with a 1st generation Intel ATOM processor with 1GB of Memory and one of very first practical SSD cards for file storage with 4GB of space. Not the most capable of machines from a hardware standpoint. ASUS shipped the machine with a rather hacked-up lightweight Linux distro. Sadly, the distribution they selected wasn’t one of the mainstream distributions like Debian, Ubuntu, or Fedora. This meant that you didn’t have access to a lot of the stuff that you need to work in an academic environment like my workplace. So, you say “Big deal, just install the NetBook Remix of Ubuntu?” It’s the problem of “Linux… just too darn fat” raising it’s ugly head again. Even the netbook oriented repackages of Ubuntu or Fedora assume a much more capable machine than what the 900A can handle.

    That got me thinking: you know the specs on this machine would have been pretty sweet back 10 years ago. So, how would I have configured Linux back around 1999 and would that configuration be useful today. First step: how to setup the OS. GNOME and KDE are right out… And that gets rid of a ton of fat right there. Think about it: how much of what those desktop managers install do you really use in the normal course of business. OK, do we even need X-Windows? Could I really be that “Tech Neanderthal” and just work with text-mode EMACS on a Linux console?

    Problem is web browsing. The guys at Google may be onto something with ChromeOS given how much time I spend during the day doing useful stuff in the web browser. However, while you can do a lot stuff using text mode browsers like w3m, a lot of the stuff you want to do just requires a GUI. OK, so we need a X-Windows and, thus, some sort of window manager to go with it. The best solution I’ve found was Fluxbox: it’s lightweight and works well.

    Beyond web browsing,everything else that I do in my life I can do from inside EMACS. Writing documents (with AUCTEX and TeXLive), reading and responding to E-mail, manage my day-to-day tasks can all be done using the “editor that thinks it’s an operating system”. So, with the base OS, X/Windows+Fluxbox, Firefox, and GNU Emacs installed, I’ve used up about 80% of the 4GB SSD. Put my /home partition (where user data is stored) on a 4GB flash card in the flash card slot combined with a well-tuned command-line installation of Dropbox and I’m in business.

    Of course there are still problems. The hardware is pretty slow, esp. when surfing to graphics-intensive web sites. I have to aggressively manage what files I keep local to the netbook given the available space. Particularly vexing is dealing with the dependency hell that is modern Linux package management. Good example is UI toolkit that I had to install for teaching purposes the other day. For one package, I had to install nearly 40 other dependent packages. It’s getting almost as bad as DLL-hell on Windows.

    So, worthy experiment? Yep, I now have a usable travel machine that’s about 3 pounds lighter than the MacBook Pro I use at work. Still saving up to get a MacBook Air, tho’. And it does lend some credence to the thought that the GNOME, KDE, Windows, and Mac OS X folks have gotten complacent about the amount of resources they use when building applications.

    Selah.