Blog

  • The Death of Online Education in the Age of ChatGPT

    Proponents of online education have claimed to have democratized learning through recorded lectures, quizzes, and scalable platforms. Yet ChatGPT and similar large language models have rendered that model obsolete. What once required structured courses and scheduled instruction can now be achieved through an intelligent, conversational tutor—available instantly to anyone with an internet connection.

    Traditional online education operates on a broadcast model: information is packaged and distributed to a mass audience. ChatGPT embodies a dialogic model—it responds, questions, adapts, and rephrases dynamically. Instead of passively watching lectures or submitting fixed quizzes, students can engage in Socratic dialogue, receiving immediate feedback and infinite tailored examples. The pedagogical advantage is immense: personalization replaces standardization.

    Economically, this shift is even more radical. Online programs justified their costs by offering scalable access to expert knowledge and institutional credentials. But ChatGPT delivers expertise at zero marginal cost and continuously updates its explanations. When employers can evaluate skill directly through projects and portfolios, expensive online credentials lose their appeal. The value of institutions shifts from information delivery to mentorship, community, and credibility.

    Most profoundly, AI tutors change our conception of knowledge itself. Online education treated knowledge as something stored and transmitted. ChatGPT treats it as something generated and negotiated. Learning becomes less about consumption and more about creation through interaction. In this landscape, the institutions that thrive will integrate human mentorship with adaptive, AI-driven exploration—not cling to static courses.

    Online education, in its original form, is dead. But in its place emerges something far more alive: a world where learning is immediate, conversational, and personalized beyond anything the MOOC era ever achieved.

    We are making rather broad claims but one can back these concepts with research in the higher education arena:

    1. Personalised learning/tutoring with ChatGPT and AI
      • A case-study found ChatGPT can provide personalised and instant feedback in a data-science education context. (The Science and Information Organization)
      • A systematic review showed students using ChatGPT perceived improved learning outcomes, personalised experiences and increased engagement. (SpringerOpen)
      • Research found ChatGPT-generated hints led to learning gains equivalent to human tutor-authored hints in mathematics. (PsyPost – Psychology News)
    2. Scalability and economic disruption of online education (MOOCs and digital delivery)
      • One study of MOOCs and online learning highlighted that while scalability is a goal, cost- and completion-rate issues remain significant. (The Journalist’s Resource)
      • A review on MOOCs pointed out that even though digital platforms can reduce cost per learner, they still require significant upfront investment and may not yield the expected economies of scale. (ResearchGate)
    3. Shift in the model of knowledge transmission
      • A paper titled “Can ChatGPT Facilitate the Implementation of Personal Learning Environments” argues that ChatGPT may push educators to reconsider why and how they teach, reflecting a shift from content delivery to interactive generation. (ERIC)
      • A systematic review of AI chatbots in education found that a key advantage is personalised assistance and adaptive responses, which contrasts with the broadcast model of traditional online courses. (SpringerOpen)

    And for the more academically minded:

    Personalised learning with ChatGPT

    • Albdrani, Raneem N., and Amal A. Al-Shargabi. “Investigating the Effectiveness of ChatGPT for Providing Personalized Learning Experience: A Case Study.” International Journal of Advanced Computer Science and Applications (IJACSA), Vol. 14, No. 11, 2023. doi:10.14569/IJACSA.2023.01411122. (The Science and Information Organization)
    • Duong Thi Thuy Mai, Can Van Da & Nguyen Van Hanh. “The Use of ChatGPT in Teaching and Learning: A Systematic Review through SWOT Analysis Approach.” Frontiers in Education, 2024. doi:10.3389/feduc.2024.1328769. (Frontiers)
    • Xu, X., Wang, X., Zhang, Y., & Ma, W. “Can ChatGPT Facilitate the Implementation of Personal Learning Environments (PLEs)?” ERIC, 2023. (ERIC Document ED654282) (ERIC)

    Economics of MOOCs and online higher education

    • Hoxby, Caroline M. “The Economics of Online Postsecondary Education: MOOCs, Nonselective Education, and Highly Selective Education.” American Economic Review, Vol. 104, No. 5, May 2014, pp. 528–33. doi:10.1257/aer.104.5.528. (American Economic Association)
    • Weigel, Margaret. “MOOCs and Online Learning: Research Roundup.” Journalists’ Resource, 22 Jan 2014. (blog-style summary of MOOC research) (The Journalist’s Resource)

    Shift in knowledge-transmission/learning-model due to AI and generative tools

    • Tulsiani, Ravinder. “ChatGPT and the Future of Personalized Learning in Higher Education.” eLearning Industry, 19 Jan 2024. (eLearning Industry)
    • Mai, Duong T. T., et al. “The Use of ChatGPT in Teaching and Learning: A Systematic Review …” Frontiers in Education, 2024. (see above) (Frontiers)

    Caveat: Yep, this post was researched using ChatGPT. I’ve made an attempt to get it into into my own voice but we shall see how it goes.

    As always, solely the opinions of the author, your mileage may vary, standard disclaimers apply.

    Selah.
  • Haven’t Done One of These in A Bit: Shrimp and Asparagus Pasta

    This is a variant of a recipe I spotted on the internet.   Found a mix of both shrimp an asparagus in the freezer, so here goes:

    INGREDENTS


    •  3 ounces uncooked thin pasta
    • 1/2 pound uncooked shrimp (16-20 per pound), peeled and deveined
    • 1/4 teaspoon salt
    • 1/8 teaspoon crushed red pepper flakes
    •  2 tablespoons olive oil, divided
    • 8 asparagus spears, trimmed and cut into 2-inch pieces
    • 1/2 cup sliced fresh mushrooms
    • 1/4 cup chopped seeded tomato, peeled
    • 4 garlic cloves, minced
    • 2 tablespoons chopped green onions
    • 1/2 cup white wine or chicken broth
    • 1-1/2 teaspoons basil
    • 1-1/2 teaspoons oregano
    • 1/4 cup grated Parmesan cheese
    • ] Lemon wedges

    Directions

    • Cook pasta according to package directions.
    • Sprinkle shrimp with salt and pepper flakes.
      • In a large skillet or wok, heat 1 tablespoon oil over medium-high heat.
      • Add shrimp; stir-fry until pink, 2-3 minutes. Remove; keep warm.
    • In same skillet, stir-fry the next 5 ingredients in remaining oil until vegetables are crisp-tender, about 5 minutes.
    • Add wine and seasonings. Return shrimp to pan.
    • Drain pasta; add to shrimp mixture and toss gently. Cook and stir until heated through, 1-2 minutes.
    • Sprinkle with Parmesan cheese. Serve with lemon wedges.


    This worked really well for a quick evening supper.

  • My First “Real” Computer

    My First “Real” Computer

    One of the “ice breaker” type of questions I ask in beginning computer science courses is “What was the first computers that really got you interested in programming?.   That leads us to talking about the history of computing and how computing has evolved over the past century.

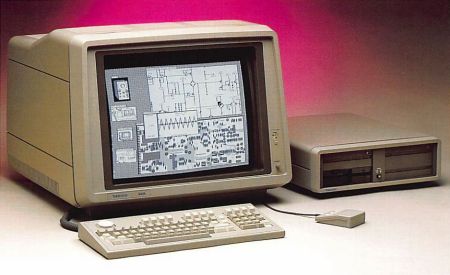
    The two machines that moved me from the “this is fun” to the “this can be a profession” mindset were computers we had in the lab I  was part of in my first attempt at graduate school:  the Tektronix 4406 and Texas Instruments Explorer LISP Workstation.

    The Tektronix 4406 Smalltalk Workstation

    Most people know Tektronix for their test equipment, with their oscilloscopes being the thing that most people remember.   They still make decent gear.    But in the mid-to-late 1980s, Tek was a bit of a corporate dilettante with their hands in a number of things.   One of those was a foray into the workstation market with machines based on the Motorola 68000 processors.

    4406.jpg

    Tek was an early player in the Smalltalk ecosystem and by late 1980s was producing a Smalltalk focused 68000 workstation that ran a rather hacked-up version of Bell Labs Version 7 UNIX.   My M.S. thesis advisor was an A.I. sort and had managed to get grant money to get one of these machines.    He had moved on to other things by this point and just told his graduate students to have fun with it.    I had been following Smalltalk since reading a popular press article on the Dynabook project and was seriously geeked out about being able to play with it.   This was my first big dive into the Smalltalk language, the Smalltalk programming environment, and the UNIX operating system.

    The Texas Instruments Explorer LISP Machine

    The thing that had captured my advisor’s attention was a TI Explorer LX Lisp Machine.  LISP Machines were interesting beasts as their processors and architecture was designed and optimized to run LISP.   Most of the CAD tools for chip design from this period were built using LISP and so TI licensed a design from LISP Machines Int’l. to create the TI Explorer product line.  One of the innovations in this design was that it used the NuBus bus architecture, which was one of the early expansion bus architectures.  So the LX included a co-processor card that that was basically an independent 68000 UNIX workstation running AT&T UNIX System III.   

    My boss told me on my first lab in the lab: “Make it work.”   So what do I on my first day?  Inadvertently do a “rm -rf *” in the root directory on the UNIX co-processor after spending about four hours loading the OS image from tape.   Oops, but what can I say as I was definitely a noob at the time.   

    Fun machine, tho’, as I got to experience the LISP Machine environment and run EMACS as God and Stallman originally intended.    A large part of the really weird stuff we see today in GNU/Emacs was a straight UX port from the LISP Machine.   Things like the “CTRL-Windows-Alt” modifier keys (CTRL-SUPER-META on the LM).    And the operating system was written entirely in LISP and you had the complete source code.    And a lot of my sysadmin experience came from having to figure out to make that co-processor work.   

    The Result

    One of the things that got me hired at NCR was they were looking for people with Smalltalk experience.   And a lot of the people who worked on the Smalltalk team at Tek migrated to NCR when NCR tried to build a UX Research Center in Atlanta in the late 80s-early 90s.    And getting exposed early to these programming environments and people who knew how to use them made me a better programmer.

    Selah.

  • How to: Unity and GitHub – Steps to get started

    Unity builds a lot of stuff, lots of which are files generated by the tools that shouldn’t be committed to version control.

    • Create new empty 3-d project in Unity Editor
    • Create a new empty repo in your GitHub account
    • Use text editor to add a README.md in the root folder of your project
    • Go to GitHub’s archives of .gitignore files and grab the .gitignore for Unity development.
      • Place this file in the root folder for your project
    • Execute the following script:
    git init
    git add README.md ,gitignore
    git commit -m "first commit"
    git branch -M main
    git remote add origin https://github.com/adamwadelewis/gallery.git
    git push -u origin main
    
    • Now add the contents of your Unity project folder to your repo and then commit and
  • How to: Configuring macOS for web development: Part 3 – A Coda to Part 1 & Homebrew

    “Wait a moment, you’re using Homebrew?”, you say Dear Reader? “If you are using Homebrew, shouldn’t we use the copy of the Apache that comes with Homebrew?”, you say?

    It’s a viable alternative. Just like with PHP and other things, using a package manager like Homebrew to install the web server in user space means that you can keep up a lot more rapidly with upstream changes in Apache. Down side is you have to undo some things in the system and remember to confirm and redo these things when you update macOS.

    Let’s go about it… we need to turn off the version of Apache included in the operating system:

    
    sudo apachectl stop
    sudo launchctl unload -w /System/Library/LaunchDaemons/org.apache.httpd.plist 2>/dev/null


    This turns off the server and unloads the system install of Apache from the list of services loaded at system startup.

    Now we get things up and running with Homebrew:

    
    brew install httpd
    brew services start httpd


    One more configuration adjustment: to keep things somewhat clean, Homebrew’s Apache installer defaults to run on port 8080 rather than port 80. This avoids conflicts issues between the system install of Apache and the Homebrew version. But we want the Homebrew version to server pages on the default port.

    How to fix this, edit /opt/homebrew/etc/httpd/httpd.conf to switch the listen port to port 80. Use your favorite edit to find the Listen line in the file and make certain it looks like this:

    
    Listen 8080


    Now restart the server using brew services restart httpd.

    An opinion

    There is a common thread among the different blogs telling you how to do this that recommends you reset the server root to the Sites folder in your home folder. This is not something I recommend you to do as I believe you need to have a separation between production and development code. Feel free to reconfigure Apache in this manner as you wish but I’ll leave figuring how to do this to be an exercise for the reader.

    Do go back and apply the changes I introduced in Part 1 of this series to get your home folder configured. All you need to do is adjust the files names to use the configuration files in your Homebrew install.

  • How to: Configuring macOS to do web development: Part 2 – PHP

    Apple recently made the decision to remove PHP from the OS image.   That’s a good call as the version included with the OS quickly gets out of date.   So, it’s up to us as software developers to manage the install and update of the development tool

    A Quick Aside

    Time to express an opinion: I am not a PHP fan. It’s a kludge of a language built on top of a kludge of web application architecture. But enough back-end stuff remains built on that architecture that one has to understand it and sometimes support it.

    Back to our regular programming

    For macOS, the simplest way to manage installing and configurating PHP is to use a package manager like Home-brew. It’s a one line install command:

    
    /bin/bash -c “$(curl -fsSL https://raw.githubusercontent.com/Homebrew/install/HEAD/install.sh)”
    

    Worth noting that is a lot of gooey, cruchy open-source goodness in the Homebrew repository.

    At this point, you can install PHP:

    
    brew install php
    

    This will get you PHP8. If you need earlier versions, then you will want to use one of the specific version casks in Brew.

    And now things get macOS ugly

    We want to configure our Apache install to use PHP. H

    Time to hack! Configuring Apache

    Things begin by adjusting our Apache configuration to load PHP. Edit the Apache httpd.conf configuration file:

    
    Sudo vi /etc/apache2/httpd.conf
    

    Add the following:

    
    LoadModule php_module /opt/homebrew/opt/php/lib/httpd/modules/libphp.so
    <FilesMatch \.php$>
        SetHandler application/x-httpd-php
    </FilesMatch>
    

    Confirm that the DirectoryIndex entry includes “index.php”:

    
    DirectoryIndex index.php index.html
    

    Now we code-sign

    Here is where Apple tightening up security in macOS 12 bits us in the posterior: Homebrew’s stuff isn’t code-signed. Means that Apache will puke upon us when it tries to load the PHP module.

    We have to manually sign the package. This requires some finagling with keychains using the Keychain Access utility and the Xcode command-line tools.

    Here things get “interesting”. We need to adjust macOS to allow us to self-sign certificates. In other words, we get to be our own “Certificate Authority”.

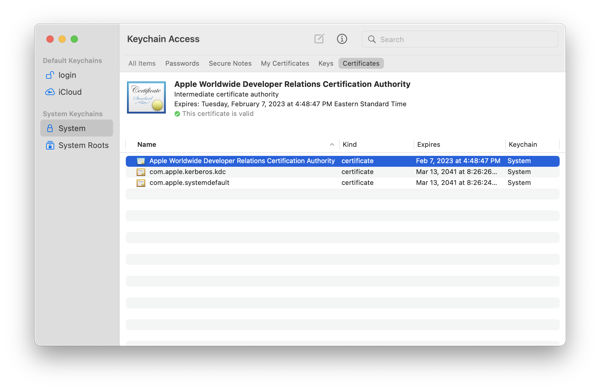
    Launch the macOS Keychain Access utility:

    UntitledImage

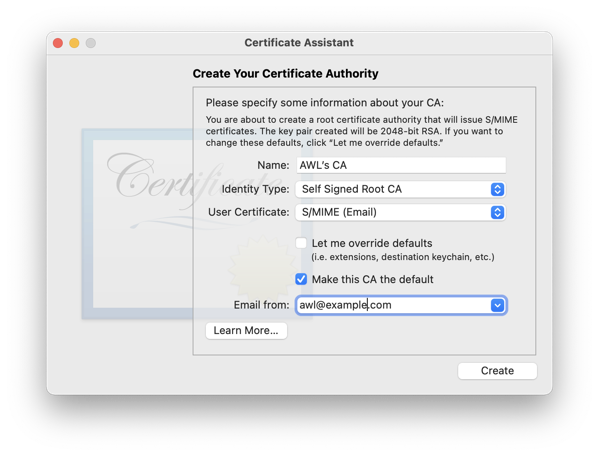
    Now goto Keychain Assistant>Certificate Assistant>Create A Certificate Authority

    . You should see something that looks like this: UntitledImage

    Do the following:

    1. Adjust the name as needed.
    2. Select “Code Signing” from the “User Certificate” dropdown.
    3. Turn on the “Let me override defaults” checkbox
    4. Enter your e-mail at the appropriate location
    5. Select “Continue“
    6. Accept defaults for Certificate Information
    7. Enter appropriate certificate information and select “Continue”
    8. Accept defaults for the Key Pair information for both certificate and users
    9. Do the same for extensions
    10. Turn on the “Extended Key Usage Extension for This CA” option
    11. Select the “Code Signing” checkbox that appears
    12. Accept defaults until you get to the create screen
    13. Turn on “On this machine, trust certificates signed by this CA“
    14. Select “Create”
    15. Close the “Certificate Assistant“

    Sign the PHP module using the Xcode command-line code signing tool (replacing ”AWL“ as required):

    
    codesign –sign ”AWL“ –force –keychain ~/Library/Keychains/login.keychain-db /opt/homebrew/opt/php/lib/httpd/modules/libphp.so


    Now again edit the Apache httpd.conf file and adjust the entry for PHP as below (again, replacing ”AWL“ with what you used in the certificate):

    
    LoadModule php_module /opt/homebrew/opt/php/lib/httpd/modules/libphp.so ”AWL"


    Now restart Apache and you should be ready to rock and roll:

    
    sudo apachectl -k restart


    Selah.

  • How to: Configuring macOS to do web development: Part 1 – Apache

    A good chunk of what we need do web development exists in macOS 12.1 (Monterey) without having to resort to add-ons like the XAMPP stack. I have enough of my students asking me how to do this that I thought I would consolidate my notes and put them up on the web so I can just point them at that reference. This is going to pull from multiple sources and I’ll try to acknowledge every one that I can. Let me know if I missed one.

    There are some things you will need to add.  Recent versions of macOS no longer include PHP as part of the operating system.  That’s actually a good thing as the tendency has been for the version included has tended to lag behind the current tip of development.  Here’s where you find yourself using a package manager like Homebrew.

    First step: Configuring Apache

    The OS includes the Apache web server.  It’s buried pretty deep into the system bits so you are going to having to apply some important skills:

    • Understanding of working with the Terminal.app to run command-line programs to update configuration files and manage the web sever
    • ,

    • Know some of the internals of the Apache web server,
    • And know how to open and save files in text editor like vi or nano.

    This information is spread over the Internet but the bulk of the material is taken from the Apple tech support discussion forum at https://discussions.apple.com/docs/DOC-250004361

    Start by editing the web server configuration file located at /etc/apache2/httpd.conf. Note that this requires admin permissions, so you will need to use sudo:

    
    sudo vi /etc/apache2/httpd.conf
    

    Look for the line in the file that enables the “Sites” folder for individual users (this is equivalent for macOS as public_html is for Linux). In recent versions of macOS, this is at line 184 in the file. Uncomment that line by removing the leading “#” comment indicator. It needs to read as follows:

    
    Include /private/etc/apache2/extra/httpd-userdir.conf


    Save and exit the editor.
     

    This change tells the web server to look for an include configuration file that will define user folders in the web server. Edit that file:

    
    sudo vi /etc/apaches2/extra/httpd-userdir.conf


    Uncomment line 16 of that file so that it reads:

    
    Include /private/etc/apache2/users/*.conf
    

    Now you need to tell the web server that about your user folders. First step, look in the Users and Group preferences pane to get your short user name. Right click on your user name in the pref pane and select “Advanced Options”. The short user name can be found in the “Account Name” field. For discussion purposes, we’ll use my short name of “alewis”. Replace this with your own when you do this,.

    Now let’s use your tex editor to create a configuration file for user folders:

    
    sudo vi /etc/apache2/users/alewis.conf
    

    Add the following content:

    
    <Directory “/Users//Sites/”>
     AddLanguage en .en
     Options Indexes MultiViews FollowSymLinks ExecCGI
     AllowOverride None
     Require host localhost
    </Directory>
    

    You will need to add additional configuration items to this file if, for example, you want to enable PHP.

    Then create the Sites folder in your home folder:

    
    mkdir ~/Sites
    echo “<html><body><h1> My site works</h1></body></html>” > ~/Sites/index.html.en
    

    This creates the Sites folder and adds a minimal working example in the folder that we can test against shortly.


    Now we have to do some shell voodoo. Apple has tightened up the security in macOS 12 to, by default, not allow other users access to a user’s folders,. The macOS installation of Apache is configured to run in a special hidden user account named “_www”. You need to setup an Access Control List (acl) that lets the web server have access to your folder:

    
    chmod +a “_www allow execute” ~/Sites
     

    And now we see if things work. With Apache, one should always use the web servers configtest command to make certain things are configured in a clean manner:

    
    apachectl configtest
     

    So… what’s apachectl? That’s a command line tool that one uses to control the web server (which is an Apache thing, and so works on any of the UNIX-based operating systems). If the config test returns ‘Syntax OK’, then you are ready to rock the web.

    Now for macOS command-line magic… you need to tell macOS to start Apache at system startup:

    
    sudo launchctl load -w /System/Library/LaunchDaemons org.apache.httpd.plist
    

    If you want to get things running in the meantime, do a:

    
    sudo apachectl graceful
     

    At this point, navigate to http://localhost and http://localhost/~<your short user name> and see if you get the expected responses from the web server.

     
    Reference: https://discussions.apple.com/docs/DOC-250004361

    Next up: Getting PHP to work using Homebrew.

  • By request, a recipe for Baked Kofta With Potatoes

    A number of people on social media asked for this recipe after I posted pictures of it when I recently made it for supper.   If memory serves me right (yep, that was an original Iron Chef reference),  I got the recipe from an episode of Milk Street TV

    INGREDIENTS 

    1 pound Yukon Gold potatoes, not peeled, sliced into ¼-inch rounds
    2 tablespoons plus ¼ cup extra-virgin olive oil, divided
    Kosher salt and ground black pepper
    1 pound ground lamb or 80 percent lean ground beef
    1 medium yellow onion, halved and grated on the large holes of a box grater
    1/2 cup finely chopped fresh flat-leaf parsley
    1/2 teaspoon ground allspice
    1/2 teaspoon ground cinnamon
    14 ½ ounce can crushed tomatoes
    2 medium garlic cloves, minced
    1 pound plum tomatoes, cored and sliced into ¼-inch rounds
    1 small green bell pepper or Anaheim chili, stemmed, seeded and sliced into thin rings

    DIRECTIONS

    Heat the oven to 450°F with a rack in the middle position. On a rimmed baking sheet, toss the potatoes with 1 tablespoon of oil and ¼ teaspoon salt. Distribute in a single layer and roast without stirring just until a skewer inserted into the potatoes meets no resistance, 10 to 13 minutes. Remove from the oven and set aside to cool slightly. Leave the oven on.

    While the potatoes cook, line a second baking sheet with kitchen parchment. In a medium bowl, combine the lamb, onion, parsley, allspice, cinnamon, ¾ teaspoon salt and ¼ teaspoon pepper. Using your hands, mix gently until just combined; do not overmix. Divide the mixture into about 20 golf ball-size portions (1½ to 1¾ inches in diameter) and place on the prepared baking sheet. Flatten each ball into a patty about 2½ inches wide and ¼ inch thick (it’s fine the patties are not perfectly round); set aside until ready to assemble.

    In a 9-by-13-inch baking dish, combine the crushed tomatoes, garlic, the ¼ cup oil, ½ teaspoon salt and ¼ teaspoon pepper. Stir well, then distribute in an even layer. Shingle the potatoes, tomato slices, green pepper rings and meat patties in 3 or 4 rows down the length of the baking dish, alternating the ingredients. Drizzle with the remaining 1 tablespoon oil and sprinkle with pepper.

    Bake, uncovered, until the kafta and potatoes are browned and the juices are bubbling, 25 to 35 minutes. Cool for about 10 minutes before serving.

  • Command Line Knowledge for macOS: “Burn” ISO to SD Card

    I have to live the “multi-operating system” life style. So. There are times where you find yourself dealing with install media that’s ISO image. And often enough, it’s my MBP that’s the only thing I’ve got connected to the network at the time.

    All right, I have to keep looking up the instructions for “burning” an ISO to removable storage so often that I just figure post them here and see if Google (or preferably, Duck Duck Go) will find them for me the next time I have to do this.

    The steps:

    1. Convert from iso to disk image format using hdiutil:
      
      hdituil convert –format UDRW -o ~/path/to/dest.img" ~/path/to/target.iso
      
       
    2. Use diskutil to find out where the removable device has been mounted into the file system.
      diskutil list
    3. Unmount the device using diskutil.
      diskutil unmountDIsk /dev/diskN
       
    4. Use dd to copy the disk image to the raw device. Note you’ll need admin access for this and do remember that dd is destructutive. THINK before hitting that enter key:
      sudo dd if=~/path/to/dest.img of=/dev/rdiskN bs=1m 
    5. Now eject the removable device:
      diskutil eject /dev/diskN

    Hopefully useful… Selah.

  • Command Line Knowledge for macOS: software update

    One of the leading reasons to dive into the command-line tools in macOS is automation.   Writing scripts that link with the Shortcuts stuff adapted from iOS means you can automate some things.

    For instance, there is a command-line tool that you can use to run software updates: software update.

    Consider:

    
    softwareupdate -l


    This gets you a list of available software just like what happens in System Preferences when you launch the Software Update preference pane. In both cases, the utilities are talking the softwareupdate daemon in the operating system.

    Next up, getting stuff installed:

    
    softwareupdate -I NAME
    softwareupdate --install name


    You replace NAME with one of the items from the list you asked for in the first step. Be careful there as macOS is very sensitive about names and format of names. You should quote the names and watch out for cases where the name has trailing spaces.

    The “-d” option will just download an update while including the “-a” option will install all available updates. One of the useful options for this command-line tool is “–install-rosetta”. This option tells macOS on Apple silicon Macs to install the Rosetta 2 hypervisor/emulator for Intel macOS applications. Include the –agree-to-license” option to agree to the software license agreement without user interaction.

    Selah.